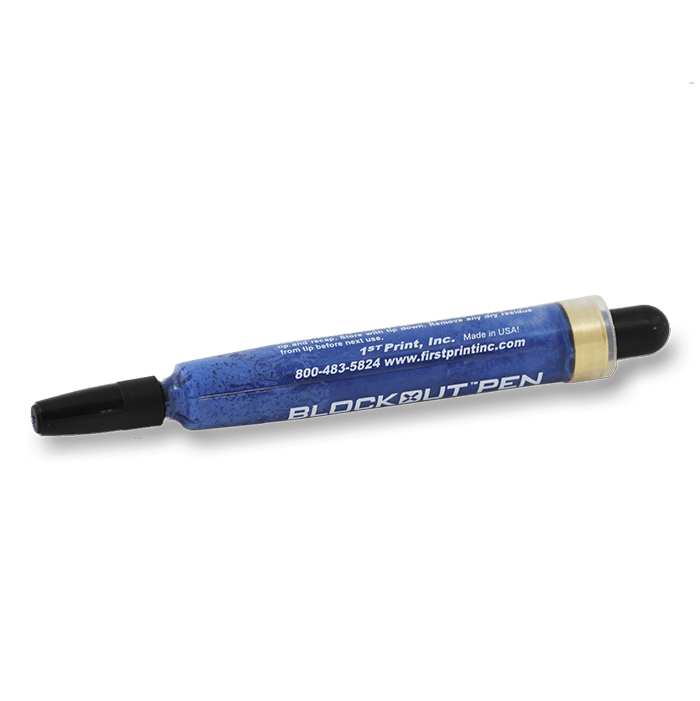
Blockout Pen Blue (For use with Water Based Inks)
Introducing the Blue Blockout Pen for Screen Printing – Your Ultimate Solution for Precision and Control!
When it comes to screen printing with water-based and plastisol inks, achieving perfect results demands precision and attention to detail. That’s where our Blue Blockout Pen steps in, revolutionizing your printing process and ensuring flawless outcomes every time.
$14.99
Description
Blockout Pen Blue (For use with Water Based Inks) Key Features:
- Advanced Blockout Formula: Our Blue Blockout Pen is specially formulated to create a reliable barrier, effectively preventing unwanted ink from passing through your screen. Say goodbye to costly mistakes and reprints.
- Easy Application: With its convenient pen-style design, applying the blockout is a breeze. The pen’s fine tip enables accurate, controlled application, ensuring precise coverage exactly where you need it.
- Versatility with Water-Based Ink: Seamlessly compatible with water-based inks, our Blue Blockout Pen allows you to conquer intricate designs and achieve vibrant prints without worrying about ink seepage.
- Plastisol-Proof: Whether you’re working with water-based or plastisol inks, our pen guarantees reliable blockout performance. Experience peace of mind knowing your screens are protected, no matter the ink type.
- Enhance Print Quality: By preventing ink bleed, our Blue Blockout Pen elevates the quality of your prints, allowing you to capture finer details and produce impeccable results that stand out.
- ✅ Easy Cleanup: When your print job is complete, the Blue Blockout Pen effortlessly washes off, leaving no residue behind. Enjoy a smooth transition between jobs without the hassle.
- Precision Control: Achieve the perfect level of blockout coverage, even in intricate areas, thanks to the pen’s precision control. Maintain the integrity of your design without compromising on accuracy.
From intricate designs to vivid prints, the Blue Blockout Pen for Screen Printing empowers you to take charge of your creative process. Elevate your craftsmanship, eliminate ink mishaps, and ensure every print is a masterpiece. Add the Blue Blockout Pen to your screen printing toolkit today and unlock a new level of precision and confidence in your work.
Technical Specifications
Directions for Using a Blockout Pen to Clean Up Pinholes on Exposed Emulsion:
- Preparation:
- Ensure that your screen has been properly exposed and washed out, leaving behind your desired image or design.
- Allow the screen to dry completely before proceeding to the blockout process.
- Inspect for Pinholes:
- Carefully examine your exposed screen for any pinholes, tiny imperfections, or areas where ink might seep through during printing.
- Pinholes are often visible as small, light spots in the emulsion.
- Gather Your Supplies:
- Obtain a blockout pen suitable for use with your specific emulsion type. Ensure it is compatible with the type of ink you intend to use.
- Have a clean, dry cloth or paper towel on hand for any potential spills.
- Test on Scrap Material:
- If you’re new to using the blockout pen, practice on a scrap piece of fabric or paper to familiarize yourself with its flow and application.
- Application:
- Hold the blockout pen like you would hold a regular pen, ensuring a firm but controlled grip.
- Gently shake the pen to activate the ink and ensure even flow.
- Starting at one end of the pinhole, gently touch the pen’s tip to the exposed emulsion.
- Using light pressure, trace over the pinhole with the pen, covering the area with a thin, even layer of blockout ink.
- Continue tracing the pinhole until it is completely covered. Take care not to apply too much pressure, as this could damage the emulsion.
- Drying:
- Allow the blockout ink to dry completely. This usually takes a few minutes, but drying times may vary based on humidity and other environmental factors.
- Inspection:
- After the blockout ink has dried, inspect the covered pinhole to ensure it has been adequately sealed. If any areas appear thin or incomplete, you can apply an additional layer of blockout ink.
- Curing (if applicable):
- If the blockout ink you’re using requires curing, follow the manufacturer’s instructions for proper curing time and temperature.
- Clean the Pen:
- After you’ve finished applying blockout to all pinholes, wipe the pen’s tip clean with a dry cloth or paper towel. Recap the pen to prevent it from drying out.
- Final Touches:
- Once all pinholes have been addressed and the blockout is dry and cured (if necessary), your screen is ready for the printing process.
Remember, practice makes perfect. As you become more comfortable using the blockout pen, you’ll develop a steady hand and better control over the application process. Properly sealing pinholes with a blockout pen ensures your prints are crisp, clean, and free from unwanted imperfections.
Technical Sheets / Safety Data Sheets / Documents
Video
Reviews
Only logged in customers who have purchased this product may leave a review.

Reviews