
River City 20” Salmon Glitter Heat Transfer Vinyl – Crafting Brilliance with Glitter
Elevate your designs to a whole new level with River City 20” Salmon Glitter Heat Transfer Vinyl. This dazzling vinyl is the ultimate choice for adding a touch of sparkle and glamour to your creations, ensuring they stand out and catch the eye. It’s not just a vinyl; it’s a statement piece that’s perfect for enhancing various items, including t-shirts, cheerleading uniforms, dancewear, and so much more.
$13.00
Description
Key Features of River City Salmon Glitter:
- Maximum Sparkle: River City Glitter Heat Transfer Vinyl offers maximum sparkle without the hassle of shedding glitter flakes. Your designs will shine and dazzle with a brilliance that’s sure to captivate, making it an ideal choice for cheerleading and dance outfits that need that extra pizzazz.
- Perfect for Apparel: Whether you’re a cheerleader, dancer, or simply want to add a touch of glamour to your t-shirts, this glitter vinyl is designed for fabric applications. It adheres seamlessly to cotton and polyester, making it versatile for various clothing items.
- Unlimited Creativity: Let your creativity run wild as you use River City Glitter to customize t-shirts for cheerleading squads, dance teams, or any occasion that calls for a touch of glitz and glam.
With River City 20” Salmon Glitter Heat Transfer Vinyl, your t-shirts for cheerleading and other apparel will not only catch the eye but also make a lasting impression. Add a touch of sparkle and dazzle to your outfits, and let your designs shine like never before!
Technical Specifications
Using River City Glitter Heat Transfer Vinyl is a fantastic way to add sparkle and shine to your projects. Here are step-by-step directions to guide you through the application process:
Materials You’ll Need:
- River City Glitter Heat Transfer Vinyl
- Cutting machine (with a compatible blade)
- Weeding tool
- Heat press or iron
- Teflon or parchment paper
- Garment or substrate for application
Step 1: Design and Cut
- Begin by creating your design in a design software program. Ensure that the design is the desired size and is mirrored (flipped horizontally) as you will be applying it face-down.
- Load the River City Glitter Heat Transfer Vinyl into your cutting machine with the shiny side (carrier sheet) down. Make sure the adhesive side is facing up.
- Adjust the settings on your cutting machine to match the recommended settings for the vinyl. Typically, a standard vinyl or heat transfer vinyl setting is suitable.
- Cut your design. The cutting machine will precisely cut through the vinyl but leave the carrier sheet intact.
Step 2: Weeding
- After cutting, carefully weed away the excess vinyl using a weeding tool. Your design should remain on the carrier sheet, with only the parts you want to transfer still attached.
Step 3: Heat Press Application
- Preheat your heat press to the recommended temperature for the River City Glitter Heat Transfer Vinyl. This temperature typically ranges from 305°F to 320°F (151°C to 160°C).
- Place the garment or substrate on the heat press and smooth out any wrinkles or folds.
- Position your weeded design (still on the carrier sheet) onto the garment with the adhesive side facing down. Ensure proper alignment.
- Cover the design and garment with a Teflon or parchment paper sheet to protect them from direct heat.
- Press the design onto the garment using medium to firm pressure for about 10-15 seconds at the recommended temperature. Adjust the pressure and time according to your specific heat press and vinyl.
Step 4: Cooling and Peeling
- After the pressing time is complete, carefully lift the heat press and remove the Teflon or parchment paper.
- Allow the garment to cool down for a few seconds. You can expedite the cooling process by moving the garment to a cooler surface.
- Once the design has cooled, gently peel away the carrier sheet, revealing the glitter brilliance of your River City Glitter design adhered to the garment.
Step 5: Final Touches
- To ensure a lasting bond, consider placing a Teflon sheet or parchment paper over the applied design and heat pressing it for an additional 2-3 seconds.
- Wait at least 24 hours before washing the garment. When washing, turn the garment inside out and use a mild detergent. Avoid bleach or other harsh chemicals.
By following these steps, you’ll be able to successfully apply River City Glitter Heat Transfer Vinyl and add a touch of sparkle and shine to your projects. Enjoy the glittering brilliance of your creations!
Specifications:
- Width: 20 inches
- Finish: Glitter
- Adheres to: 100% cotton, 100% uncoated polyester, poly/cotton blends
- Blade: 45°/60°
- Composition: PU
- Thickness: 90 microns / 3.5 mils
With River City 20” Salmon Glitter Heat Transfer Vinyl, your designs will shine like never before. Unleash your creativity and add a touch of sparkle to dancewear, team apparel, or any project where you crave that extra glamour. Elevate your creations with the dazzling brilliance of Glitter HTV today!
| Application instructions (home iron) • Set iron dial between Cotton and Linen • Cover design with Multipurpose Paper or Heat Transfer Cover Sheet • Place on flat, hard surface (ironing board not recommended) • Press iron with medium/firm pressure (do not slide iron) • Press each section of design for 15-20 seconds • If areas of design lift after application, replace cover sheet and re-press for 10 seconds • Peel carrier warm |
Application Instructions (heat press) • Cover design with Multipurpose Paper or Heat Transfer Cover Sheet • Preheat garment for 2-3 seconds • Apply design at 320°F/160°C • Use medium pressure for 15-20 seconds • Peel carrier warm |
 |
Cricut: Blade: Standard Setting: Iron-on+ |
 |
Silhouette Cameo: Blade: Standard, 4 Material: Heat Transfer, Smooth Speed: 8 Force: 11 |
 |
Brother ScanNCut: Blade: Standard, 3 Cut Speed: 1 Cut Pressure: 5 |
 |
Roland GX/GS-24: Blade: 45° Gram Force: 180-190 Offset: .250 Speed: 30 cm/s |
 |
Graphtec: Blade: 45° Force: 17 Tool: CB09U+0 Speed: 30 cm/s |
 |
MH, SC2, LP3, and Titan1: Blade: 45°/60° Gram Force: 120-130 Speed: 300 mm/s *Blade Advancing Varies |
 |
Titan 2 & 3: Blade: 45°/60° Gram Force: 100-110 Speed: 300 mm/s *Blade Advancing Varies |
Settings may vary based on blade condition and age of machine. Always perform a test cut prior to cutting designs.
Laundering:
- Wait 24 hours before first wash
- Machine wash warm or cold / mild detergent
- Dry on normal dryer setting
- Do not dry clean
Technical Sheets / Safety Data Sheets / Documents
Video
Reviews
Only logged in customers who have purchased this product may leave a review.
You May Also Like
Related products
-

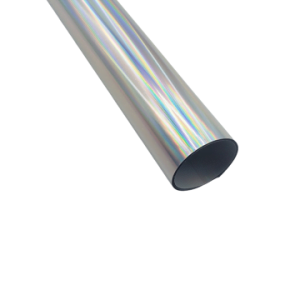
River City 20” Spectrum Foil Heat Transfer Vinyl – Metallic Brilliance
$12.00 -
Sale!
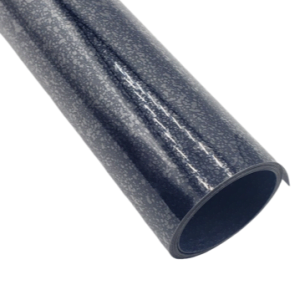
Siser EasyWeed 20” Navy Twinkle Heat Transfer Vinyl – Dazzle with Sparkly Crafting Creations
Original price was: $12.50.$10.50Current price is: $10.50. -
Siser 20” Currant Heat Transfer Vinyl – Crafting Brilliance with Glitter
$14.00 -
Siser Easyweed 15” Stretch Royal Purple Heat Transfer Vinyl – Thin and Flexible HTV
$10.99

Reviews